
杨会清的个人网站
爱生活,爱编程,学习使我快乐
爱生活,爱编程,学习使我快乐
当一个组件内容比较多,同时有逻辑处理和UI数据渲染时,维护起来比较困难。这个时候可以拆分成“UI组件”和”容器组件”。
拆分的时候,容器组件把数据和方法传值给子组件,子组件用props接收。
需要注意的是:
子组件调用父组件方法函数时,并传递参数时,可以把方法放在箭头函数中(直接在函数体使用该参数,不需要传入箭头函数)。
拆分实例
未拆分前原组件
import React, {Component} from 'react';
import 'antd/dist/antd.css'; // or 'antd/dist/antd.less'
import { Input, Button, List } from 'antd';
// 引用store
import store from './store';
import { inputChangeAction, addItemAction, deleteItemAction } from './store/actionCreators';

class TodoList extends Component {
  constructor(props) {
    super(props);
    // 获取store,并赋值给state
    this.state = store.getState();

    // 统一在constructor中绑定this,提交性能
    this.handleInputChange = this.handleInputChange.bind(this);
    this.handleStoreChange = this.handleStoreChange.bind(this);
    this.handleClick = this.handleClick.bind(this);

    // 在组件中订阅store,只要store改变就触发这个函数
    this.unsubscribe = store.subscribe(this.handleStoreChange);
  }

  // 当store状态改变时,更新state
  handleStoreChange() {
    // 用从store中获取的state,来设置state
    this.setState(store.getState());
  }

  render() {
    return (
      <div style={{margin: '10px'}}>
        <div className="input">
          <Input
            style={{width: '300px', marginRight: '10px'}}
            value={this.state.inputValue}
            onChange={this.handleInputChange}
          />
          <Button type="primary" onClick={this.handleClick}>提交</Button>
        </div>
        <List
          style={{marginTop: '10px', width: '300px'}}
          bordered
          dataSource={this.state.list}
          renderItem={(item, index) => (<List.Item onClick={this.handleDelete.bind(this, index)}>{item}</List.Item>)}
        />
      </div>
    )
  }

  // 组件注销前把store的订阅取消
  componentWillUnmount() {
    this.unsubscribe();
  }

  // 输入内容时(input框内容改变时)
  handleInputChange(e) {
    const action = inputChangeAction(e.target.value);
    store.dispatch(action);
  }

  // 添加一项
  handleClick () {
    const action = addItemAction();
    store.dispatch(action);
  }

  // 点击删除当前项
  handleDelete (index) {
    const action = deleteItemAction(index);
    store.dispatch(action);
  }
}

export default TodoList;
拆分后-容器组件
import React, {Component} from 'react';

// 引用store
import store from './store';
import { inputChangeAction, addItemAction, deleteItemAction } from './store/actionCreators';
import TodoListUI from './TodoListUI';

class TodoList extends Component {
  constructor(props) {
    super(props);
    // 获取store,并赋值给state
    this.state = store.getState();

    // 统一在constructor中绑定this,提交性能
    this.handleInputChange = this.handleInputChange.bind(this);
    this.handleStoreChange = this.handleStoreChange.bind(this);
    this.handleClick = this.handleClick.bind(this);

    // 在组件中订阅store,只要store改变就触发这个函数
    this.unsubscribe = store.subscribe(this.handleStoreChange);
  }

  // 当store状态改变时,更新state
  handleStoreChange() {
    // 用从store中获取的state,来设置state
    this.setState(store.getState());
  }

  render() {
    return (
      <TodoListUI
        inputValue={this.state.inputValue}
        list={this.state.list}
        handleInputChange={this.handleInputChange}
        handleClick={this.handleClick}
        handleDelete={this.handleDelete}
      />
    )
  }

  // 组件注销前把store的订阅取消
  componentWillUnmount() {
    this.unsubscribe();
  }

  // 输入内容时(input框内容改变时)
  handleInputChange(e) {
    const action = inputChangeAction(e.target.value);
    store.dispatch(action);
  }

  // 添加一项
  handleClick () {
    const action = addItemAction();
    store.dispatch(action);
  }

  // 点击删除当前项
  handleDelete (index) {
    const action = deleteItemAction(index);
    store.dispatch(action);
  }
}

export default TodoList;
拆分后-UI组件
import React, { Component } from 'react';
import 'antd/dist/antd.css'; // or 'antd/dist/antd.less'
import { Input, Button, List } from 'antd';

class TodoListUI extends Component {
  render() {
    return (
      <div style={{margin: '10px'}}>
        <div className="input">
          <Input
            style={{width: '300px', marginRight: '10px'}}
            value={this.props.inputValue}
            onChange={this.props.handleInputChange}
          />
          <Button type="primary" onClick={this.props.handleClick}>提交</Button>
        </div>
        <List
          style={{marginTop: '10px', width: '300px'}}
          bordered
          dataSource={this.props.list}
          // renderItem={(item, index) => (<List.Item onClick={(index) => {this.props.handleDelete(index)}}>{item}-{index} </List.Item>)}
          renderItem={(item, index) => (<List.Item onClick={() => {this.props.handleDelete(index)}}>{item}-{index} </List.Item>)}
        />
        {/* 子组件调用父组件方法函数时,并传递参数时,可以把方法放在箭头函数中(直接在函数体使用该参数,不需要传入箭头函数)。 */}
      </div>
    )
  }
}

export default TodoListUI;
当一个组件只有render函数时,可以用无状态组件代替。
例如下面这个例子
普通组件:
class TodoList extends Component {
  render() {
    return <div> {this.props.item} </div>
  }
}
无状态组件:
const TodoList = (props) => {
  return(
    <div> {props.item} </div>
  )}
1、引入axios,使用axios发送数据请求
import axios from 'axios';
2、在componentDidMount中调用接口
componentDidMount() {
  axios.get('/list.json').then(res => {
    const data = res.data;
    // 在actionCreators.js中定义好initListAction,并在reducer.js中作处理(此处省略这部分)
    const action = initListAction(data);
    store.dispatch(action);
  })
}
npm install redux-thunk --save
// 引用applyMiddleware
import { createStore, applyMiddleware } from 'redux';
import reducer from './reducer';
import thunk from 'redux-thunk';

// 创建store时,第二个参数传入中间件
const store = createStore(
  reducer,
  applyMiddleware(thunk)
);

export default store;
// 引入compose
import { createStore, applyMiddleware, compose} from 'redux';
import reducer from './reducer';
import thunk from 'redux-thunk';

const composeEnhancers = window.__REDUX_DEVTOOLS_EXTENSION_COMPOSE__ ? window.__REDUX_DEVTOOLS_EXTENSION_COMPOSE__({}) : compose;
const enhancer = composeEnhancers(
  applyMiddleware(thunk),
);

const store = createStore(reducer, enhancer);

export default store;
在actionCreators.js中创建返回一个方法的action,并导出。在这个方法中执行http请求。
import types from './actionTypes';
import axios from 'axios';

export const initItemAction = (value) => ({
  type: types.INIT_TODO_ITEM,
  value: value
})

// 当使用redux-thunk后,action不仅可以是对象,还可以是函数
// 返回的如果是方法会自动执行
// 返回的方法可以接收到dispatch方法,去派发其它action
export const getTodoList = () => {
  return (dispatch) => {
    axios.get('/initList').then(res => {
      const action = initItemAction(res.data);
      dispatch(action);
    })
  }
}

export const inputChangeAction = (value) => ({
  type: types.CHANGE_INPUT_VALUE,
  value: value
})

export const addItemAction = (value) => ({
  type: types.ADD_TODO_ITEM
})

export const deleteItemAction = (index) => ({
  type: types.DELETE_TODO_ITEM,
  value: index
})
import React, {Component} from 'react';

import store from './store';
import { getTodoList } from './store/actionCreators';

class TodoList extends Component {

  ...

  // 初始化数据(使用redux-thunk派发/执行一个action函数)
  componentDidMount() {
    const action = getTodoList();
    store.dispatch(action);
  }

  ...
}

export default TodoList;
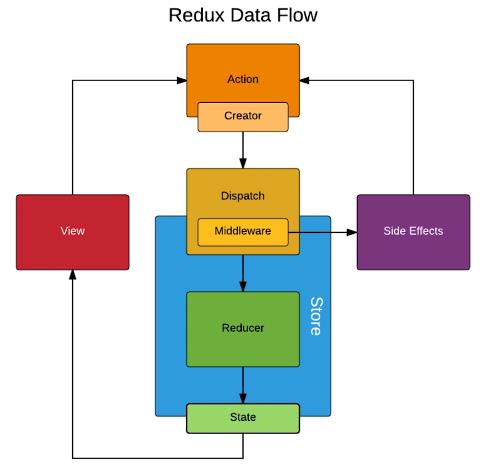
几个常见中间件的作用(对dispatch方法的升级)
npm install --save redux-saga
或
yarn add redux-saga
import { createStore, applyMiddleware} from 'redux';
import createSagaMiddleware from 'redux-saga';

import reducer from './reducer';
import mySaga from './sagas';

const sagaMiddleware = createSagaMiddleware();
const store = createStore(reducer, applyMiddleware(sagaMiddleware));
sagaMiddleware.run(mySaga);

export default store;
import { createStore, applyMiddleware, compose} from 'redux';
import createSagaMiddleware from 'redux-saga';

import reducer from './reducer';
import mySaga from './sagas';

const sagaMiddleware = createSagaMiddleware();
const composeEnhancers = window.__REDUX_DEVTOOLS_EXTENSION_COMPOSE__ ? window.__REDUX_DEVTOOLS_EXTENSION_COMPOSE__({}) : compose;
const enhancer = composeEnhancers(
  applyMiddleware(sagaMiddleware),
);
const store = createStore(reducer, enhancer);
sagaMiddleware.run(mySaga);

export default store;
在actionCreators.js中创建一个普通的action,并导出。
import types from './actionTypes';
// import axios from 'axios';

export const initItemAction = (value) => ({
  type: types.INIT_TODO_ITEM,
  value: value
})

// redux-thunk的写法,异步请求依然在这个文件中
// export const getTodoList = () => {
//   return (dispatch) => {
//     axios.get('/initList').then(res => {
//       const action = initItemAction(res.data);
//       dispatch(action);
//     })
//   }
// }

// redux-saga的写法,这里返回一个普通action对象;
// sagas.js中会用takeEvery监听这个type类型,然后执行对应的异步请求
export const getTodoList = () => ({
  type: types.GET_INIT_ACTION,
})

export const inputChangeAction = (value) => ({
  type: types.CHANGE_INPUT_VALUE,
  value: value
})

export const addItemAction = (value) => ({
  type: types.ADD_TODO_ITEM
})

export const deleteItemAction = (index) => ({
  type: types.DELETE_TODO_ITEM,
  value: index
})
import { takeEvery, put } from 'redux-saga/effects';
import types from './actionTypes';
import axios from 'axios';
import { initItemAction } from './actionCreators';

function* getInitList() {
  try {
    const res = yield axios.get('/initList');
    const action = initItemAction(res.data);
    yield put(action);
  } catch(e) {
    console.log('接口请求失败');
  }
}

// generator 函数
function* mySaga() {
  yield takeEvery(types.GET_INIT_ACTION, getInitList);
}

export default mySaga;
import React, {Component} from 'react';

import store from './store';
import { getTodoList } from './store/actionCreators';

class TodoList extends Component {

  ...

  // 初始化数据(使用redux-saga派发一个普通action对象,经由sagas.js的generator 函数匹配处理后,再交由store的reducer处理)
  componentDidMount() {
    const action = getTodoList();
    store.dispatch(action);
  }

  ...
}

export default TodoList;
npm install react-redux --save
- 使用react-redux的Provider组件(提供器)包裹所有组件,把 store 作为 props 传递到每一个被 connect() 包装的组件。
- 使组件层级中的 connect() 方法都能够获得 Redux store,这样子内部所有组件就都有能力获取store的内容(通过connect链接store)。
原代码
import React from 'react';
import ReactDOM from 'react-dom';
import TodoList from './todoList';

ReactDOM.render(<TodoList />, document.getElementById('root'));
修改后代码
import React from 'react';
import ReactDOM from 'react-dom';
import TodoList from './TodoList';
import { Provider } from 'react-redux';
import store from './store';

// Provider向内部所有组件提供store,内部组件都可以获得store
const App = (
  <Provider store={store}>
    <TodoList/>
  </Provider>
)

ReactDOM.render(App, document.getElementById('root'));
Provider的子组件通过react-redux中的connect连接store,写法:
connect(mapStateToProps, mapDispatchToProps)(Component)
- mapStateToProps:store中的数据映射到组件的props中;
- mapDispatchToProps:把store.dispatch方法挂载到props上;
- Component:Provider中的子组件本身;
导出的不是单纯的组件,而是导出由connect处理后的组件(connect处理前是一个UI组件,connect处理后是一个容器组件)。
原代码
import React, { Component } from 'react';
import store from './store';

class TodoList extends Component {
  constructor(props) {
    super(props);
    // 获取store,并赋值给state
    this.state = store.getState();

    // 统一在constructor中绑定this,提交性能
    this.handleChange = this.handleChange.bind(this);
    this.handleStoreChange = this.handleStoreChange.bind(this);
    this.handleClick = this.handleClick.bind(this);

    // 在组件中订阅store,只要store改变就触发这个函数
    this.unsubscribe = store.subscribe(this.handleStoreChange);
  }

  // 当store状态改变时,更新state
  handleStoreChange() {
    // 用从store中获取的state,来设置state
    this.setState(store.getState());
  }

  render() {
    return(
      <div>
        <div>
          <input value={this.state.inputValue} onChange={this.handleChange} />
          <button onClick={this.handleClick}>提交</button>
        </div>
        <ul>
          {
            this.state.list.map((item, index) => {
              return <li onClick={() => {this.handleDelete(index)}} key={index}>{item}</li>
            })
          }
        </ul>
      </div>
    )
  }

  // 组件注销前把store的订阅取消
  componentWillUnmount() {
    this.unsubscribe();
  }

  handleChange(e) {
    const action = {
      type: 'change-input-value',
      value: e.target.value
    }
    store.dispatch(action);
  }

  handleClick() {
    const action = {
      type: 'add-item'
    }
    store.dispatch(action)
  }

  handleDelete(index) {
    const action = {
      type: 'delete-item',
      value: index
    }
    store.dispatch(action);
  }
}

export default TodoList;
修改后代码
省去了订阅store使用store.getState()更新状态的操作。组件会自动更新数据。
import React, { Component } from 'react';
import { connect } from 'react-redux';

class TodoList extends Component {
  render() {
    // const { inputValue, handleChange, handleClick, list, handleDelete} = this.props;

    return(
      <div>
        <div>
          <input value={this.props.inputValue} onChange={this.props.handleChange} />
          <button onClick={this.props.handleClick}>提交</button>
        </div>
        <ul>
          {
            this.props.list.map((item, index) => {
              return <li onClick={() => {this.props.handleDelete(index)}} key={index}>{item}</li>
            })
          }
        </ul>
      </div>
    )
  }
}

// 把store的数据 映射到 组件的props中
const mapStateToProps = (state) => {
  return {
    inputValue: state.inputValue,
    list: state.list
  }
}

// 把store的dispatch 映射到 组件的props中
const mapDispatchToProps = (dispatch) => {
  return {
    handleChange(e) {
      const action = {
        type: 'change-input-value',
        value: e.target.value
      }
      dispatch(action);
    },
    handleClick() {
      const action = {
        type: 'add-item'
      }
      dispatch(action)
    },
    handleDelete(index) {
      const action = {
        type: 'delete-item',
        value: index
      }
      dispatch(action);
    }
  }
}

export default connect(mapStateToProps, mapDispatchToProps)(TodoList);
import { createStore } from 'redux';
import reducer from './reducer'

const store = createStore(reducer);

export default store;
const defaultState = {
  inputValue: '',
  list: []
}
export default (state = defaultState, action) => {
  const { type, value } = action;
  let newState = JSON.parse(JSON.stringify(state));

  switch(type) {
    case 'change-input-value':
      newState.inputValue = value;
      break;
    case 'add-item':
      newState.list.push(newState.inputValue);
      newState.inputValue = '';
      break;
    case 'delete-item':
      newState.list.splice(value, 1);
      break;
    default:
      return state;
  }

  return newState;
}
- 因现在组件(TodoList.js)中代码只是用来渲染,是UI组件。并且没有状态(state),是个无状态组件。所以可以改成无状态组件,提高性能。
- 但connect函数返回的是一个容器组件。
import React from 'react';
import { connect } from 'react-redux';

const TodoList = (props) => {
  const { inputValue, handleChange, handleClick, list, handleDelete} = props;

  return(
    <div>
      <div>
        <input value={inputValue} onChange={handleChange} />
        <button onClick={handleClick}>提交</button>
      </div>
      <ul>
        {
          list.map((item, index) => {
            return <li onClick={() => {handleDelete(index)}} key={index}>{item}</li>
          })
        }
      </ul>
    </div>
  )
}


// 把store的数据 映射到 组件的props中
const mapStateToProps = (state) => {
  return {
    inputValue: state.inputValue,
    list: state.list
  }
}

// 把store的dispatch 映射到 组件的props中
const mapDispatchToProps = (dispatch) => {
  return {
    handleChange(e) {
      const action = {
        type: 'change-input-value',
        value: e.target.value
      }
      dispatch(action);
    },
    handleClick() {
      const action = {
        type: 'add-item'
      }
      dispatch(action)
    },
    handleDelete(index) {
      const action = {
        type: 'delete-item',
        value: index
      }
      dispatch(action);
    }
  }
}

export default connect(mapStateToProps, mapDispatchToProps)(TodoList);