
杨会清的个人网站
爱生活,爱编程,学习使我快乐
爱生活,爱编程,学习使我快乐
canvas中有阴影API,但是没有内阴影API。下面我们就用阴影相关的API和
clip()方法结合,写一个内阴影的效果出来。
1.1、阴影相关属性如下:
| 属性 | 描述 |
|---|---|
| shadowColor | 设置或返回用于阴影的颜色。 |
| shadowBlur | 设置或返回用于阴影的模糊级别。 |
| shadowOffsetX | 设置或返回阴影与形状的水平距离。 |
| shadowOffsetY | 设置或返回阴影与形状的垂直距离 |
1.2、clip()方法
clip()方法从原始画布中剪切任意形状和尺寸。
提示:一旦剪切了某个区域,则所有之后的绘图都会被限制在被剪切的区域内(不能访问画布上的其他区域)。您也可以在使用 clip() 方法前通过使用 save() 方法对当前画布区域进行保存,并在以后的任意时间对其进行恢复(通过 restore() 方法)。
给闭合线(如:矩形、圆等)设置阴影,然后把线以及线外部的阴影裁切掉,只留线内部的阴影。从而达到内阴影效果。
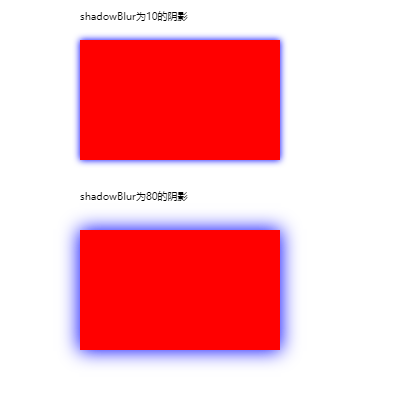
// shadowBlur为10的阴影
ctx.fillStyle = '#f00';
// 阴影
ctx.shadowColor = '#00f';
ctx.shadowBlur = 10;

ctx.fillRect(80, 40, 200, 120);

// shadowBlur为30的阴影
ctx.fillStyle = '#f00';
// 阴影
ctx.shadowColor = '#00f';
ctx.shadowBlur = 30;

ctx.fillRect(80, 230, 200, 120);
效果如下图(点击查看源代码)
// 线宽为2,shadowBlur为10的阴影
ctx.strokeStyle = '#f00';
ctx.lineWidth = 2;
// 阴影
ctx.shadowColor = '#00f';
ctx.shadowBlur = 10;
ctx.beginPath();
ctx.strokeRect(20, 40, 150, 120);

// 线宽为2,shadowBlur为30的阴影
// 阴影
ctx.shadowColor = '#00f';
ctx.shadowBlur = 30;
ctx.beginPath();
ctx.strokeRect(220, 40, 150, 120);

// 线宽为20,shadowBlur为10的阴影
ctx.lineWidth = 20;
// 阴影
ctx.shadowColor = '#00f';
ctx.shadowBlur = 10;
ctx.beginPath();
ctx.strokeRect(20, 230, 150, 120);

// 线宽为20,shadowBlur为30的阴影
ctx.lineWidth = 20;
// 阴影
ctx.shadowColor = '#00f';
ctx.shadowBlur = 30;
ctx.beginPath();
ctx.strokeRect(220, 230, 150, 120);
效果如下图(点击查看源代码)
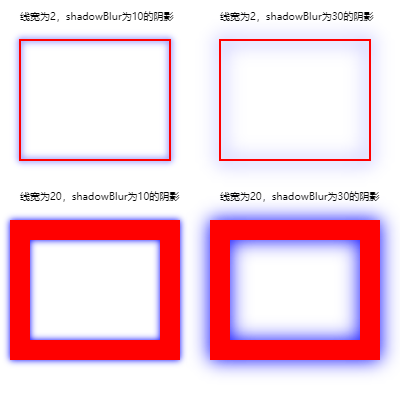
总结:
1、shadowBlur值越大,范围变大,但阴影也更模糊。
2、线越宽,阴影越清晰。
3、所有这两个属性相结合一起控制【内阴影】的大小。
ctx.strokeStyle = '#f00';
ctx.lineWidth = 7;

// 单独内阴影
rectInnerShadow(ctx, 80, 40, 200, 120);

// 矩形框和内阴影一起时,要先画内阴影
rectInnerShadow(ctx, 20, 230, 150, 120);
ctx.strokeRect(20, 230, 150, 120);

// 否则会有重叠(因为线是向两侧画的)
ctx.strokeRect(220, 230, 150, 120);
rectInnerShadow(ctx, 220, 230, 150, 120);

// 【矩形内阴影(边框+阴影,再把边框和外阴影裁剪掉)】
// 参数说明:ctx上下文内容,x,y,w,h同rect的入参,shadowColor阴影颜色,shadowBlur和lineWidth一同控制阴影大小。
function rectInnerShadow (ctx, x, y, w, h, shadowColor, shadowBlur, lineWidth) {
  var shadowColor = shadowColor || '#00f'; // 阴影颜色
  var lineWidth = lineWidth || 20; // 边框越大,阴影越清晰
  var shadowBlur = shadowBlur || 30; // 模糊级别,越大越模糊,阴影范围也越大。

  ctx.save();
  ctx.beginPath();

  // 裁剪区(只保留内部阴影部分)
  ctx.rect(x, y, w, h);
  ctx.clip();

  // 边框+阴影
  ctx.beginPath();
  ctx.lineWidth = lineWidth;
  ctx.shadowColor = shadowColor;
  ctx.shadowBlur = shadowBlur;
  // 因线是由坐标位置向两则画的,所以要移动起点坐标位置,和加大矩形。
  ctx.strokeRect(x - lineWidth/2, y - lineWidth/2 , w + lineWidth, h + lineWidth);

  // 取消阴影
  ctx.shadowBlur = 0;

  ctx.restore();
}
效果如下图(点击查看源代码)
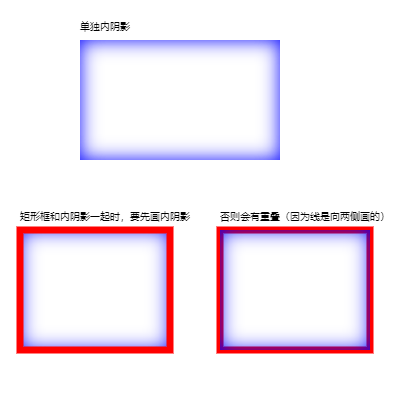
总结:
1、给闭合线(如:矩形、圆等)设置阴影,然后把线以及线外部的阴影裁切掉,只留线内部的阴影。从而达到内阴影效果。
2、矩形框和内阴影一起时,要先画内阴影。否则会有重叠(因为线是向两侧画的)。
圆形内阴影
/*****【圆形内阴影】*****/

// 单独内阴影
arcInnerShadow(ctx, 100, 100, 50);

// 圆环+内阴影(要先画内阴影,再画圆)
arcInnerShadow(ctx, 280, 100, 50);
ctx.beginPath();
ctx.arc(280, 100, 50, 0, 2*Math.PI);
ctx.stroke();

// 【圆形内阴影(边框+阴影,再把边框和外阴影裁剪掉)】
// 参数说明:ctx上下文内容,x,y,r同arc的入参,shadowColor阴影颜色,shadowBlur和lineWidth一同控制阴影大小。
function arcInnerShadow (ctx, x, y, r, shadowColor, shadowBlur, lineWidth) {
  var shadowColor = shadowColor || '#00f'; // 阴影颜色
  var lineWidth = lineWidth || 20; // 边框越大,阴影越清晰
  var shadowBlur = shadowBlur || 30; // 模糊级别,越大越模糊,阴影范围也越大。

  ctx.save();
  ctx.beginPath();

  // 裁剪区(只保留内部阴影部分)
  ctx.arc(x, y, r, 0, 2*Math.PI);
  ctx.clip();

  // 边框+阴影
  ctx.beginPath();
  ctx.lineWidth = lineWidth;
  ctx.shadowColor = shadowColor;
  ctx.shadowBlur = shadowBlur;
  // 因线是由坐标位置向两则画的,所以半径加上线宽的一半。同时又因为线有毛边,所以半径再多加1px,处理毛边。
  ctx.arc(x, y, r + lineWidth/2 + 1, 0, 2*Math.PI);
  ctx.stroke();

  // 取消阴影
  ctx.shadowBlur = 0;

  ctx.restore();
}
圆角矩形内阴影
/*****【圆角矩形内阴影】*****/
// 只画阴影
roundRectInnerShadow(ctx, 30, 230, 150, 120, 10);

// 线和阴影同时画时,要先画阴影,否则会有重叠(因为线是向两侧画的)
roundRectInnerShadow(ctx, 220, 230, 150, 120, 10);

roundRect(ctx, 220, 230, 150, 120, 10);
ctx.stroke();


// 【圆角矩形内阴影(边框+阴影,再把边框和外阴影裁剪掉)】
// 参数说明:ctx上下文内容,x,y,w,h同rect的入参,r圆角的半径,shadowColor阴影颜色,shadowBlur和lineWidth一同控制阴影大小。
function roundRectInnerShadow (ctx, x, y, w, h, r, shadowColor, shadowBlur, lineWidth) {
  var r = r || 5; // 圆角半径
  var shadowColor = shadowColor || '#00f'; // 阴影颜色
  var lineWidth = lineWidth || 20; // 边框越大,阴影越清晰
  var shadowBlur = shadowBlur || 30; // 模糊级别,越大越模糊,阴影范围也越大。

  ctx.save();
  ctx.beginPath();

  // 裁剪区(只保留内部阴影部分)
  roundRect(ctx, x, y, w, h, r);
  ctx.clip();

  ctx.strokeStyle = '#00f';
  // 边框+阴影
  ctx.beginPath();
  ctx.lineWidth = lineWidth;
  ctx.shadowColor = shadowColor;
  ctx.shadowBlur = shadowBlur;
  // 因线是由坐标位置向两则画的,所以要移动起点坐标位置,和加大矩形。
  roundRect(ctx, x - lineWidth/2, y - lineWidth/2 , w + lineWidth, h + lineWidth, r);
  ctx.stroke();

  // 取消阴影
  ctx.shadowBlur = 0;

  ctx.restore();
}

// 【圆角矩形】
// 入参说明:上下文、左上角X坐标,左上角Y坐标,宽,高,圆角的半径
function roundRect (ctx, x, y, w, h, r) {
  ctx.beginPath();
  ctx.moveTo(x + r, y);

  // 右上角弧线
  ctx.arcTo(x + w, y, x + w, y + r, r);

  // 右下角弧线
  ctx.arcTo(x + w, y + h, x + w - r, y + h, r);

  // 左下角弧线
  ctx.arcTo(x, y + h, x, y + h - r, r);

  // 左上角弧线
  ctx.arcTo(x, y, x + r, y, r);
}
效果如下图(点击查看源代码)
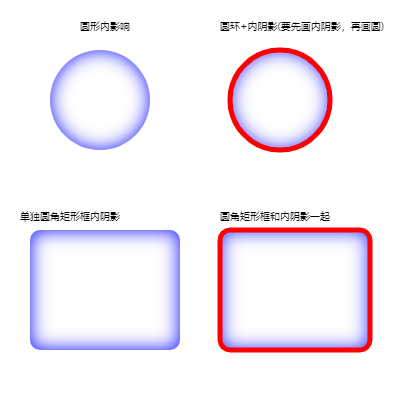
本文只写了矩形、圆形、圆角矩形的内阴影的实现方法,其它闭合线的内阴影实现方法同理可得。